Astrophotography Adventures for Stargazer Married Pairs
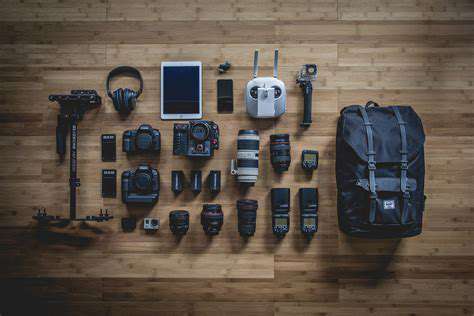
Essential Gear for Stellar Shots
To photograph the night sky effectively, you'll need more than just a camera. A rock-solid tripod is non-negotiable for crisp, long-exposure images that don't suffer from camera movement. Serious astrophotographers often invest in telescopes or spotting scopes mounted on sturdy equatorial mounts to track celestial objects smoothly. When selecting a camera, prioritize models with larger sensors and excellent low-light performance to capture faint stars and nebulae with clarity.
Specialized filters can dramatically improve your results by cutting through light pollution and enhancing specific wavelengths emitted by cosmic objects. These accessories help reveal the true colors and structures of distant galaxies that might otherwise appear washed out. Many photographers find that dedicated astrophotography lenses or telescope adapters significantly boost their setup's capabilities.
Mastering Exposure Settings for Cosmic Clarity
The key to revealing the universe's hidden details lies in perfecting your exposure triangle. Faint deep-sky objects demand much longer exposures than bright planets or the moon. Balancing ISO, aperture, and shutter speed requires patience and practice - too high an ISO introduces noise, while too long an exposure might create star trails. Getting these settings right separates casual snapshots from professional-grade astrophotography. Always use a remote trigger or your camera's timer to eliminate vibration during critical exposures.
Through experimentation, you'll learn how different combinations affect your images of celestial targets. Some objects benefit from wider apertures, while others require narrower settings for sharper focus across the frame. This trial-and-error process ultimately leads to breathtaking captures that do justice to the night sky's wonders.
Planning Your Celestial Adventures
Successful astrophotography begins long before nightfall with thorough preparation. Scout locations far from city lights where the Milky Way shines brightly. Check weather forecasts and moon phases - new moon nights offer the darkest skies. Escaping light pollution makes all the difference when photographing faint nebulae and distant galaxies. Understanding your target's movement helps plan the perfect composition and exposure sequence.
Astronomy apps and software can predict when specific objects will be optimally positioned. Some programs even simulate how celestial bodies will appear in your images based on your equipment. This advanced planning transforms random shooting into intentional, high-yield photography sessions that maximize your time under the stars.
Mastering the Art of Celestial Composition: Techniques for Stunning Shots
Understanding the Fundamentals of Celestial Navigation
Ancient navigators relied on the stars to traverse vast oceans, using celestial bodies as their GPS. This time-tested method depends on recognizing how Earth's rotation makes stars appear to move across our sky. Modern astrophotographers benefit from understanding these same principles when framing their shots.
The celestial sphere concept remains vital for locating and tracking cosmic subjects throughout the night. This imaginary dome helps predict where and when objects will be visible from your location.
Essential Tools for Celestial Observation
While today's digital tools have replaced brass sextants, the core concepts of measuring angles between stars persist. Smartphone apps now provide instant identification of constellations and planets overhead. However, traditional planispheres and star charts still offer reliable backups when technology fails under the open sky.
Calculating Position from Celestial Observations
Precise astrophotography often requires knowing exactly where you're pointing your camera. Advanced imagers sometimes use plate solving - comparing star patterns in their photos to astronomical databases. This mathematical approach ensures perfect framing of faint objects invisible to the naked eye.
The Role of Time in Celestial Navigation
Timing proves crucial when photographing celestial events. Meteor showers peak at specific hours, while planetary conjunctions might last mere minutes. Accurate timekeeping ensures you don't miss these fleeting cosmic moments. Many photographers sync their shoots with Universal Time to coordinate with astronomy resources.
Navigating by the Sun, Moon, and Stars
Each celestial body offers unique photographic opportunities. The sun requires special filters for safe imaging, while the moon's phases create dramatically different lighting conditions. Star trails showcase Earth's rotation when captured over hours, whereas short exposures freeze individual stars as pinpoints.
Overcoming Challenges in Celestial Navigation
Atmospheric turbulence, unexpected clouds, and equipment failures test every astrophotographer's patience. Polar alignment can frustrate beginners, while dew formation might ruin a perfect night. Successful photographers develop contingency plans and know when to adapt their goals.
The Future of Celestial Navigation
While automated mounts and GPS simplify finding celestial targets, understanding traditional methods enhances your photographic intuition. This knowledge proves invaluable when technology fails or when seeking particularly challenging compositions.
Sharing Your Galactic Journey: Capturing and Sharing Memories
Planning Your Celestial Adventure
Before heading out, detailed preparation separates successful shoots from frustrating misses. Create checklists for equipment, backup batteries, and warm clothing. Study your target's rising/setting times and how it will move across your frame throughout the night.
Equipment Essentials for Galactic Exploration
Beyond cameras and telescopes, consider red-light headlamps to preserve night vision, intervalometers for time-lapses, and portable power solutions. The right accessories often make the difference between capturing a masterpiece or missing the shot.
Capturing the Cosmos: Exposure and Techniques
Advanced techniques like image stacking require shooting dozens of identical frames. Dark frames (lens-capped shots at the same settings) help remove sensor noise during processing. Patience during acquisition pays off tremendously in post-production.
Sharing Your Galactic Journey: Post-Processing and Presentation
Astrophotography rarely shows its full potential straight from the camera. Specialized software like PixInsight or Photoshop with astronomy tools can reveal hidden details. When sharing online, consider platforms that preserve image quality rather than over-compressing your hard-won cosmic portraits.
Read more about Astrophotography Adventures for Stargazer Married Pairs


Hot Recommendations
- AI for dynamic inventory rebalancing across locations
- Visibility for Cold Chain Management: Ensuring Product Integrity
- The Impact of AR/VR in Supply Chain Training and Simulation
- Natural Language Processing (NLP) for Supply Chain Communication and Documentation
- Risk Assessment: AI & Data Analytics for Supply Chain Vulnerability Identification
- Digital twin for simulating environmental impacts of transportation modes
- AI Powered Autonomous Mobile Robots: Enabling Smarter Warehouses
- Personalizing Logistics: How Supply Chain Technology Enhances Customer Experience
- Computer vision for optimizing packing efficiency
- Predictive analytics: Anticipating disruptions before they hit